This week our currency strategists focused on the New Zealand Employment Report (Q1 2025) for potential high-quality setups.
Out of the four scenario/price outlook discussions this week, our AUD/NZD discussion arguably saw both fundie & technical arguments triggered to become a potential candidate for a trade & risk management overlay.
Watchlists are price outlook & strategy discussions supported by both fundamental & technical analysis, a crucial step towards creating a high quality discretionary trade idea before working on a risk & trade management plan.
If you’d like to follow our “Watchlist” picks right when they are published throughout the week, you can subscribe to BabyPips Premium.
Check out our review on this discussion to see what happened!
AUD/NZD: Tuesday – May 6, 2025

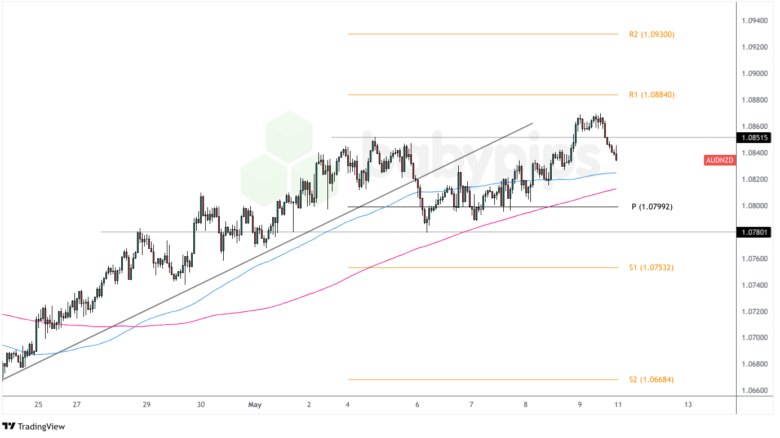
AUD/NZD: 1-Hour Forex Chart by TradingView
On Tuesday, our strategists had their sights set on the New Zealand Q1 2025 jobs report and its potential impact on the New Zealand dollar.
Based on our Event Guide, expectations were for employment to show a modest 0.1% q/q increase, with the unemployment rate holding steady at 5.1%. The labor cost index was forecast to rise by 0.5%, slightly down from 0.6% in the previous quarter.
With mixed labor market indicators (BusinessNZ economic conditions showing labor market weakness, while manufacturing PMI employment levels reached their highest since July 2021), here’s what we were thinking:
The “Kiwi Climb” Scenario:
If the jobs data came in stronger than expected, we anticipated this could dash hopes of near-term RBNZ rate cuts. We focused on NZD/JPY for potential long strategies if risk sentiment was positive, especially given the recent not-so-hawkish comments from Japanese officials.
In a risk-off environment, AUD/NZD long was our pair of choice relative “immunity” of the New Zealand in the U.S.-China tariffs drama compared to that of Australia, which has closer trade ties to China.
The “Kiwi Collapse” Scenario:
If New Zealand’s labor market showed significant weakness, we thought this could fuel RBNZ easing expectations. We considered GBP/NZD for potential long strategies if risk sentiment stayed positive, particularly given the pair’s position near key support around 2.2200 and the U.K.’s relatively less exposure to heavy U.S. tariffs drama.
If risk sentiment leaned negative, NZD/CHF short made sense given Switzerland’s stronger fundamental position and the potential for safe-haven flows into CHF if global anxiety increased.
What Actually Happened
- New Zealand’s Q1 2025 jobs report showed mixed results but with some positive elements:
- Employment rose by 0.1% q/q, matching expectations
- Unemployment rate remained steady at 5.1% as forecast
- Labor cost index increased by 0.4% q/q (vs. 0.5% forecast; 0.6% previous)
- Average hourly earnings climbed 3.9% y/y, showing persistent wage pressure
- Public sector wages showed particularly strong growth at 5.1% y/y
- The participation rate edged slightly lower to 71.2% from 71.3%
RBNZ Governor Hawkesby commented after the release that while the labor market was performing largely as expected, the central bank remained cautious about wage pressures and would continue monitoring inflation risks before considering any policy adjustments.
Market Reaction
This outcome presented a somewhat mixed fundamental picture for NZD, with the employment data showing both strengths and weaknesses. With risk sentiment leaning positive during the week (supported by progress on U.S. trade deals and positive Chinese export data), AUD/NZD became our focus pair.
Looking at the AUD/NZD chart, the pair had been trending upward since late April but was consolidating in the 1.0800 area when the NZ jobs data hit the wires. The initial reaction saw some buying pressure as traders digested the steady unemployment rate and ongoing wage growth, but AUD/NZD soon dipped toward the pivot point level (1.0799).
However, the downside was limited as the market reassessed the softer-than-expected labor cost index against the backdrop of Australia’s political stability following PM Albanese’s Labor Party election victory. The pair found support precisely at the Pivot Point (1.0799), which also coincided with the upward trend line and the 100 SMA.
As the week progressed, bullish momentum returned with AUD/NZD pushing up decisively toward and beyond the R1 (1.0884) Pivot level. This move was supported by positive Australian economic data (MI inflation gauge and ANZ job ads) as well as broader market risk appetite fueled by progress on U.S. trade deals and the announced U.S.-China trade talks.
By Friday, despite some profit-taking that pulled the pair back from its highs near 1.0870, AUD/NZD maintained most of its gains, closing well above the pivot point and respecting the overall uptrend that had been in place since late April.
The Verdict
So, how’d we do? Based on the chart, our fundamental analysis anticipated potential NZD weakness if employment data disappointed, and while the outcome was mixed rather than clearly negative, the softer labor cost index did provide a slight dovish tilt.
Looking at price action, AUD/NZD actually dropped initially after the jobs report (contrary to our bearish NZD bias), suggesting the steady unemployment rate and wage pressure components were initially viewed as NZD positive. However, the market quickly reversed course, with AUD/NZD bouncing strongly from the pivot point level (1.0799) and eventually rallying toward and beyond the R1 (1.0884) pivot level.
The pair reached as high as 1.0870 by the end of the week, representing a significant move from the post-data reaction low. This suggests that while the immediate reaction didn’t align with our scenario, the fundamental backdrop ultimately supported our directional bias as traders fully digested the implications of the mixed data.
We think this discussion was “neutral-likely” supportive of a net positive outcome, though with an important caveat: traders would have needed to wait for the initial reaction to play out and enter once the market confirmed our bias with a bounce from the pivot/trend line support area. This reinforces the value of patience and waiting for price action confirmation rather than trading the immediate news reaction.
For those who caught the move after the initial volatility settled, proper trade management with stops below the pivot point (1.0799) while targeting the R1 level would have delivered a favorable risk-reward outcome as the pair spent much of the rest of the week trading well above the pivot level and testing R1 resistance.